Vegetables

Vegan Butternut Squash Pasta with Battered Sage Leaves

Butternut Squash Pasta with Batter Fried Sage Leaves from dontmissdairy.com
Sage leaves frying in a pan of olive oil is one of the best smells in the WORLD.

Batter frying them is so simple, you’ll wonder why you haven’t done it before! They are a perfect addition to anything with butternut squash or pumpkin, but they can also stand alone.

Batter fried sage leaves from dontmissdairy.com

Dipping sage leaves in flour and water batter.

Batter fried sage leaves from dontmissdairy.com

Frying battered sage leaves in olive oil.

I’m just going to warn you, fried sage leaves taste so incredible you’re going to be sad if you don’t make more than this recipe calls for, and you’re going to want to eat them before your pasta’s ready. I highly suggest making some extra to snack on.

Batter fried sage leaves from dontmissdairy.com

I was so excited to make butternut squash pasta when the winter squashes started arriving in stores. Luckily they can sit on your counter for weeks and still be in great condition, because life has been so busy in November that I haven’t had many chances to cook or post.

Butternut Squash Pasta with Battered Sage Leaves from dontmissdairy.com
I saw an amazing looking recipe in a magazine for butternut squash pasta made with bacon, but I wanted to keep this one healthy, vegan, and as simple as possible. I combined a few different recipes to get what I wanted, plus added my own touch.

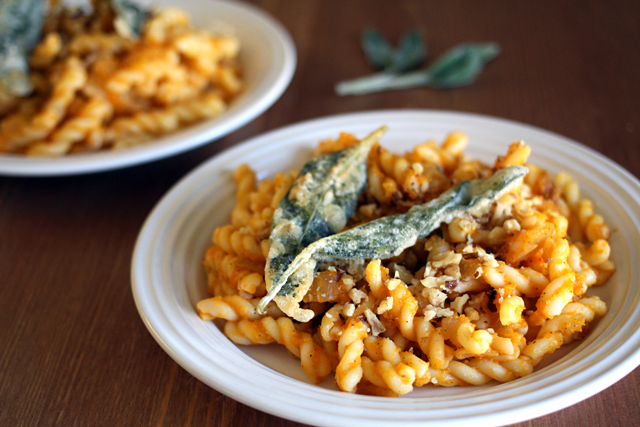
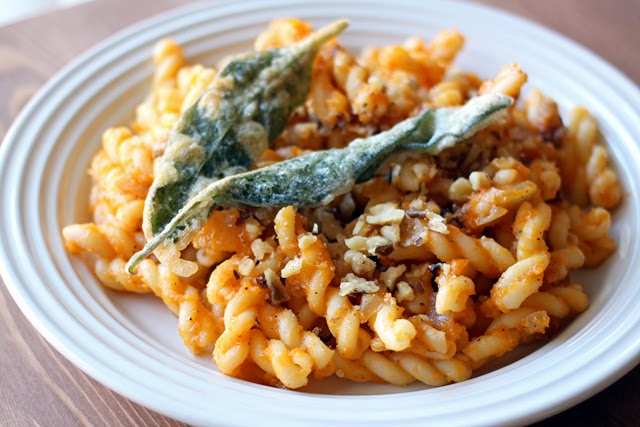
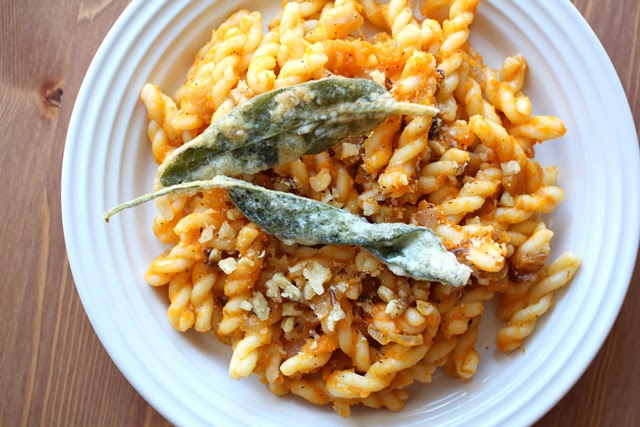
One of my favorite pasta dishes in the world is Il Fornaio’s  Walnut Butternut Squash Ravioli. They pour on a brown butter and tomato sauce and add battered sage leaves. I wanted to replicate this without the added process of making fresh pasta–I groan at complicated recipes–and of course, I needed to make this dairy free. Instead of cream and tomato for that acidic touch, I used Moscato. It pairs perfectly with this pasta dish.

So here it is, a restaurant worthy dish made simple, healthy, and vegan. The recipe makes four servings of pasta, but you can easily double it for a family or dinner party. Just use the whole squash, the whole onion, a pound of pasta, an 1/8 teaspoon of nutmeg, and double everything else.

Butternut Squash Pasta with Battered Sage Leaves
Serves 4
Write a review
Print
Total Time
50 min
Total Time
50 min
Ingredients
  1. 1/2 butternut squash
  2. 1/4 cup sweet white wine
  3. 1 tablespoon Smart Balance Light
  4. 1/2 yellow onion
  5. 1/2 tsp salt
  6. 1/2 tsp pepper
  7. 1/2 lb pasta (I used gemelli)
  8. dash nutmeg
  9. 1/2 cup crumbled walnuts**
  10. Parmigiano reggiano*
Instructions
  1. Heat oven to 375 degrees Fahrenheit.
  2. Cut squash in half lengthwise, carefully. Scoop out seeds. Pour 1/4 cup water into a large glass casserole dish. Add squash to dish. Bake for 30 minutes or until squash is soft enough to be pierced with a fork.
  3. While the squash is baking, fry batter dipped sage leaves in oil.
  4. When squash is tender, allow to sit and cool for 10 minutes.
  5. Meanwhile, start to cook pasta according to directions.
  6. In a large saucepan over medium heat, cook yellow onion in Smart Balance for 10 minutes or until translucent and beginning to brown.
  7. Scoop preferred amount of cooled squash from the skin and place into blender.
  8. Puree with 1/4 cup sweet white wine, such as Moscato, but don't over process to leave some texture.
  9. Add butternut squash puree to the saucepan of onions, along with nutmeg, salt, and pepper. Cook for 5-10minutes, until heated through. Wine or broth can be added to make a thinner consistency if needed.
  10. Add cooked, drained pasta to the saucepan and toss in butternut squash sauce until evenly coated.
  11. To serve, sprinkle with crumbled walnuts,* parmigiano reggiano,**and top with fried sage leaves.
Notes
  1. This recipe is halved for the convenience of cooking for two. If you are cooking for a family, it's very easy to double. Use the whole squash, the whole onion, and 1 lb. of pasta.
  2. *optional
  3. **To crumble place in Ziploc bag and run over with rolling pin.
don't miss dairy https://dontmissdairy.com/
Fried Sage Leaves
Write a review
Print
Ingredients
  1. 1/2 cup flour
  2. 1/4 cup water
  3. 10-15 big sage leaves
  4. 1/4 cup extra virgin olive oil for frying
  5. sea salt
Instructions
  1. Wash the leaves and dry them on a paper towel.
  2. Whisk the water and flour together until the batter becomes smooth.
  3. Heat the olive oil in a nonstick skillet over medium low heat (not too hot or it will burn). Dip the leaves in the batter and let the extra batter drip off.
  4. Fry the sage leaves about 1 minute each side until crispy and a light golden color.
  5. Place them on a paper towel and sprinkle them with a dash of sea salt.
don't miss dairy https://dontmissdairy.com/

Butternut Squash Pasta with Battered Sage Leaves from dontmissdairy.com

Healthy Chili with a Kick

Low Sodium Chili from dontmissdairy.com
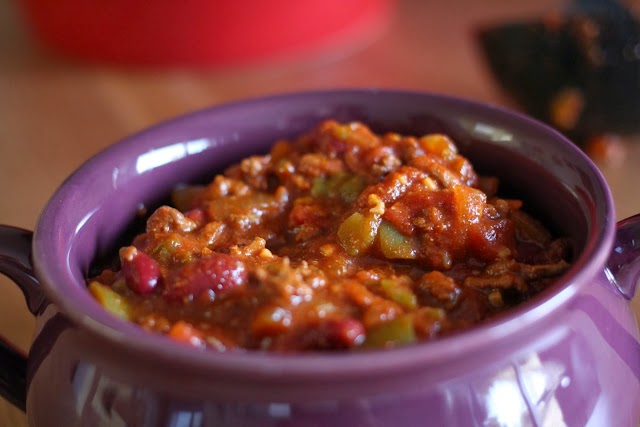
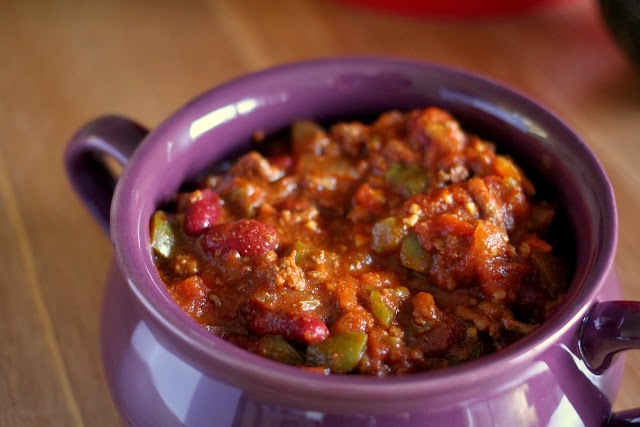
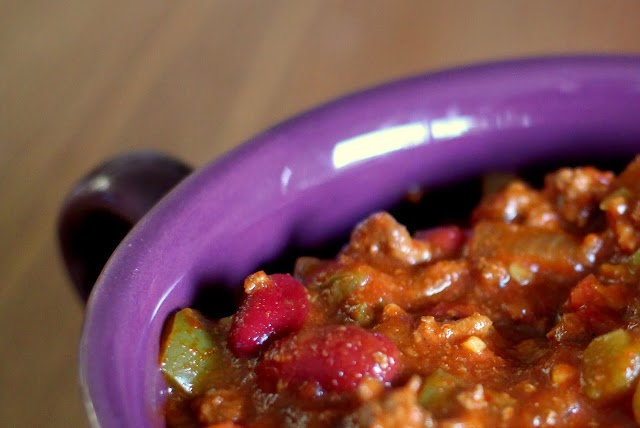
(Updated from original post “Low Sodium Chili” on November 10th, 2011)

You don’t need to add more salt to a dish to add flavor, just add more flavor! To make chili less complicated, canned tomatoes, sauce, and beans are a great option. But this usually packs your chili with a ton of sodium.

It’s unnecessary.

Opt for “no salt added” canned goods instead and you will create a much healthier meal. These are conveniently labeled in the canned goods section of your local grocery store. You can always add more salt to taste in your finished recipe. It’s easier to add salt than remove it!

Here is my go-to chili recipe that replaces all added sodium with a couple teaspoons of sea salt and uses sugar and spice to bring out a flavorful meal for chilly nights.

I grew some delicious (but super hot) Bulgarian Carrot Peppers in my garden this year, and they are a key ingredient. Make sure you wear gloves when dicing them! If the oils get in your skin it will burn like crazy.

Healthy chili from dontmissdairy.com!

You can make this deliciously spicy, low fat, low sodium chili quickly on the stove top–it will take about 30 minutes to cook. Or, you could simmer it for four to six hours in the Crockpot, whatever method suits your time and energy level.

I usually cook it on low in the Crockpot when I want to come home from work to a ready dinner. If you choose this method, make sure you sauté your veggies over the stovetop before adding them to the slow cooker for the best flavor.

Use 93% or higher lean ground beef to make this recipe even healthier. I try to find 96% lean. It’s more expensive but worth it when it comes to eliminating excess fat from your diet. 

Healthy Chili with a Kick
Serves 6
Write a review
Print
Prep Time
10 min
Cook Time
40 min
Prep Time
10 min
Cook Time
40 min
Ingredients
  1. 1 pound 93% or higher lean ground beef
  2. 1/2 teaspoon ground pepper
  3. 1 tablespoon olive oil
  4. 1 large yellow onion, diced
  5. 1 green bell pepper, diced
  6. 1 red bell pepper, diced
  7. 1-2 Bulgarian carrot peppers or serrano chili peppers, diced
  8. 2 cloves garlic, minced
  9. 2 cans no salt added diced tomatoes
  10. 1 can unsalted tomato paste
  11. 2 cans no salt added kidney beans, rinsed and drained
  12. 1/4 cup red wine such as Cabernet Sauvignon
  13. 1/4-1/2 cup water or low sodium beef broth
  14. 1 bay leaf
  15. 2 tablespoons chili powder
  16. 2 teaspoons sea salt
  17. 1/2 teaspoon paprika
  18. 1/2 teaspoon ground red pepper
  19. 1 tablespoon white sugar
Instructions
  1. In a large stock pot over medium heat, sprinkle the black pepper onto the ground beef and cook meat until browned and no pink remains. Carefully drain excess fat then return pot to stovetop.
  2. Add olive oil, onion, peppers, and salt to the pot. Stir and cook for five minutes, or until onions and peppers begin to turn translucent.
  3. Make a well in the middle of the pot ingredients and add the minced garlic. Cook garlic for no more than 30 seconds before stirring with the rest of the mixture.
  4. Add the diced tomatoes with liquid, drained and rinsed kidney beans, tomato paste, wine, water or broth, sugar, spices, and bay leaf into the pot. Set on medium high heat to start the boiling process.
  5. Once the mixture starts to bubble, reduce to medium low heat and cover. Simmer for thirty minutes, stirring occasionally. If you make it in the Crockpot, cook on low for at least six hours or high for four hours. Salt to taste.
Notes
  1. Serve with shredded vegan cheese, chopped onions, and lactose free sour cream!
don't miss dairy https://dontmissdairy.com/

Low sodium chili recipe from dontmissdairy.com
Low sodium chili from dontmissdairy.com

Swiss Chard and Garbanzo Bean Soup

Swiss Chard and Garbanzo Bean Soup

Nothing in my garden has done better than my beautiful and hardy Rainbow Swiss Chard.

I never would have grown Swiss Chard, but three things made it happen this year. The first was that, since I was planting in July, I needed to plant vegetables that were able to withstand brutal heat but also fare well in the coming cooler weather.

Second, my brother grew Red Swiss Chard this summer. He picked some from his garden while I was visiting in June and asked if I could cook it for him. I made it too spicy for his taste, but I loved it.

The third reason I grew this vegetable is because my husband went with me to the nursery and picked it out (how could I say no?).

At first, I thought it wouldn’t survive the heat when I planted the tiny seedlings. Even though they had partial shade during the day, they still looked a little droopy. Never did I think they would grow into tall, full, beautiful multicolored leaves, but they did!

Rainbow Swiss Chard for Swiss Chard and Garbanzo Bean Soup
It is an absolutely gorgeous plant. What’s better is that the chard plants have been in their little earth box for three months, continually sprouting new leaves.

I just keep cutting leaves off the side of the shoots near the base of the plant. I did this to make it last as long as possible, and it still hasn’t quit. It hasn’t had a single pest problem or caught a disease. It’s the healthiest, tastiest, prettiest plant that I ever did grow.

If you’re interested in starting a small patio garden, I recommend this as a perfect pot plant to begin with.

Rainbow Swiss Chard from my garden.

The hard thing isn’t coming up with recipes to use it in but having enough of it for the recipes I come up with! I planted six seedlings, and I’ve only been able to make a few recipes. I’ve been wanting to try it in a nice fall soup, and I finally got my chance.

With the recent cooler weather, my chard flourished even more, giving me a huge crop that complements this simple vegan vegetable soup very nicely. This recipe is quick to make on the stove, but you can cook it in the crock pot easily, too.

Just make sure you add the chard during the final minutes of cooking. While it can withstand longer cooking times, it tastes best lightly cooked.

And don’t you dare throw those beautiful stems away! Cook them in my Swiss Chard with Bacon recipe or fry them in some olive oil, salt, & black and red pepper.

Ingredients:
(Scroll to the bottom for easy to read and print recipe card)

1 tablespoon extra virgin olive oil
1 yellow onion
1 teaspoon sea salt
1 teaspoon black pepper
2 carrots, diced
2 celery ribs, diced
1 teaspoon sage
1 teaspoon thyme
3 cloves garlic, minced
4 cups unsalted vegetable stock
1 can garbanzo beans, rinsed and drained
1/4 cup sweet white wine, such as Riesling
1 bunch Rainbow Swiss Chard (10-12 leaves),  coarsely chopped or torn and stems removed

Directions:

1. In a large stock pot over medium heat, add olive oil, onions, salt, and pepper. Cook onions for three minutes, then add carrots, stirring occasionally. Add a splash of cooking stock and a splash of white wine. Cook for about five minutes.

Sautéing onion.

Sautéing onions and carrots

2. When onions are translucent looking and carrots become soft, add celery, sage, thyme. Cook for two minutes.

Add celery.

3. Add garlic, stir, and cook for no more than 30 seconds. Add vegetable stock, the rest of the white wine, and garbanzo beans and stir.

Add garlic.

Add vegetable stock.

Garbanzo beans in a colander.

4. Bring soup to a boil, then reduce heat, cover, and cook for 15 minutes.

5. After 15 minutes, add the chard and stir. Cover and cook for five more minutes. Remove pot from heat and uncover. Serve and enjoy. I’d love to hear your comments!

Chopped Rainbow Swiss Chard with Stems removed.

Adding the chard to the soup.

Swiss chard and garbanzo bean soup

Close up of swiss chard soup.

Even closer close up of swiss chard soup.

Swiss Chard and Garbanzo Bean Soup
Serves 6
Write a review
Print
Prep Time
10 min
Cook Time
25 min
Total Time
35 min
Prep Time
10 min
Cook Time
25 min
Total Time
35 min
Ingredients
  1. 1 tablespoon extra virgin olive oil
  2. 1 yellow onion
  3. 1 teaspoon sea salt
  4. 1 teaspoon black pepper
  5. 2 carrots, diced
  6. 2 celery ribs, diced
  7. 1 teaspoon sage
  8. 1 teaspoon thyme
  9. 3 cloves garlic, minced
  10. 4 cups unsalted vegetable stock
  11. 1 can garbanzo beans, rinsed and drained
  12. 1/4 cup sweet white wine, such as Riesling
  13. 1 bunch Rainbow Swiss Chard (10-12 leaves), coarsely chopped or torn and stems removed
Instructions
  1. In a large stock pot over medium heat, add olive oil, onions, salt, and pepper. Cook onions for three minutes, then add carrots, stirring occasionally. Add a splash of cooking stock and a splash of white wine. Cook for about five minutes.
  2. When onions are translucent looking and carrots become soft, add celery, sage, thyme. Cook for two minutes.
  3. Add garlic, stir, and cook for no more than 30 seconds. Add vegetable stock, the rest of the white wine, and garbanzo beans and stir.
  4. Bring soup to a boil, then reduce heat, cover, and cook for 15 minutes.
  5. After 15 minutes, add the chard and stir. Cover and cook for five more minutes. Remove pot from heat and uncover. Serve and enjoy.
Notes
  1. You can cook this in the crock pot, too. Just make sure you add the chard during the final minutes of cooking. While it can withstand longer cooking times, chard tastes best lightly cooked.
don't miss dairy https://dontmissdairy.com/

Want to be notified as soon as I post a new recipe? Please subscribe to my blog to receive emails for each new post, or follow me on Pinterest or Google+. Thanks for reading!