Coconut Oil

Follow Me on Instagram

Instagram

Follow Me on Pinterest

don't miss dairy

Emily Stokes
I'm a lady who loves cheese, sour cream, & ice cream, but I recently became lactose intolerant. My key focus in recreating dairy recipes is taste, but I try to be as health conscious as possible. Some of my recipes are low lactose rather than dairy free. I'm also a writer, teacher, nanny, dog mom, housewife, native Yinzer, current Californian, and social organizer extraordinaire.

Coconut Oil

Blueberry Cashew “Cream Cheese”

Blueberry Cashew Cream Cheese from dontmissdairy.com
Last month I had the pleasure of trying a delicious cashew cream parfait made by a friend on a weekend getaway to Santa Barbara. It was light-tasting, creamy, and delicious. I must say, I was reluctant to embark on the cashew cream experience, but it does open up a new world of dairy-free possibilities. 

One drawback to cashew recipes is prep time. Depending on what you make, it can take days to complete. Cashews usually require soaking, a high powered blender, and patience, and this blueberry cream cheese recipe is no exception. I do have a few options, though, for those who like to take the faster route.

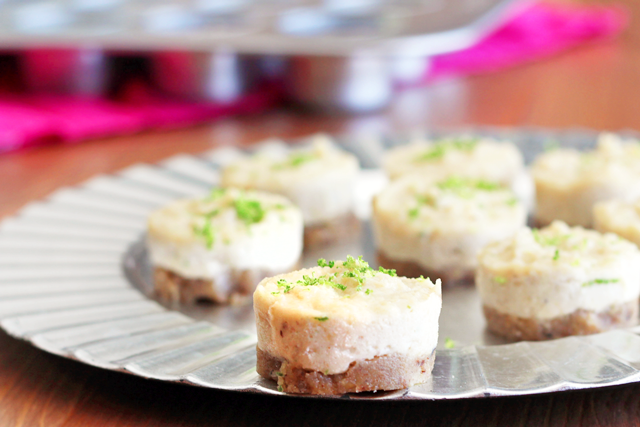
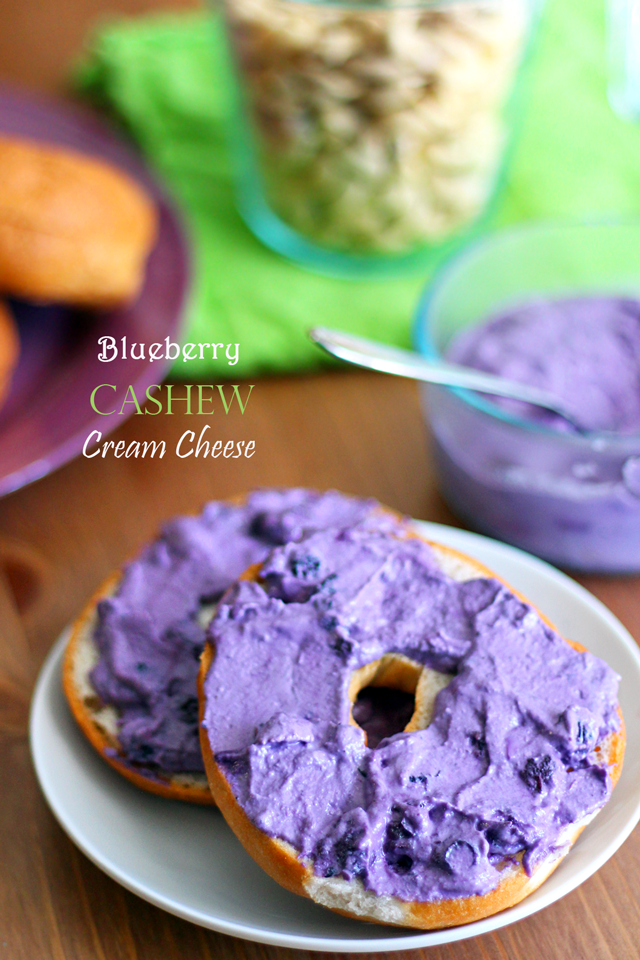
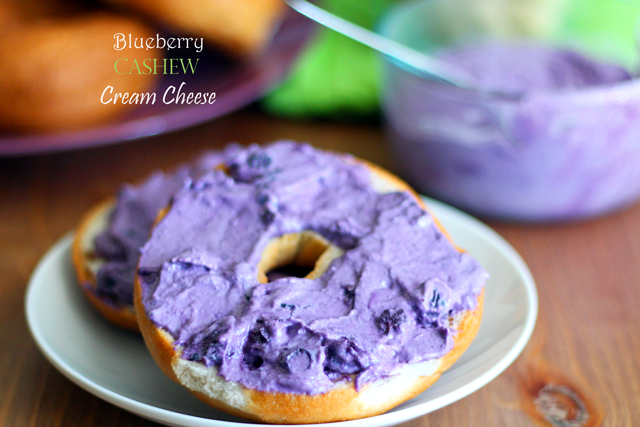
Either way, the result is this: a soft and sweet cashew spread in a delectable shade of purple, perfect for topping bagels or even spreading on cakes. 

Blueberry Cashew Cream Cheese from dontmissdairy.com

For a firm cream cheese, like you would normally buy in a block at the grocery store, you have a few options. The simplest is straining the cream cheese after processing in a cheesecloth overnight.

Do this before adding any extra flavors to the cream cheese but after you add the salt, lemon juice, and vinegar. I do this by fitting the cheese cloth over a bowl, large cup, or pitcher with a rubber band and setting the cream cheese on top.

Blueberry Cashew Cream Cheese from dontmissdairy.com

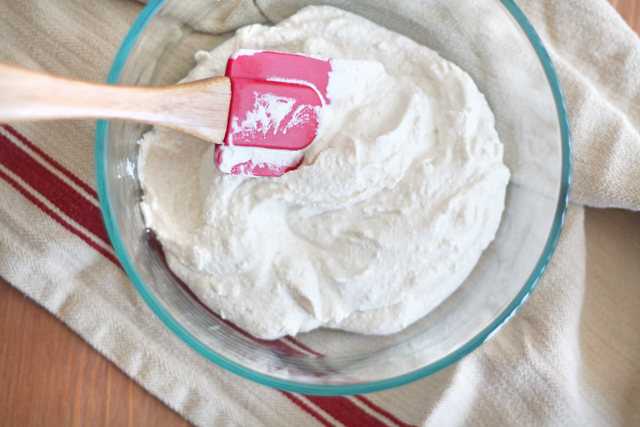
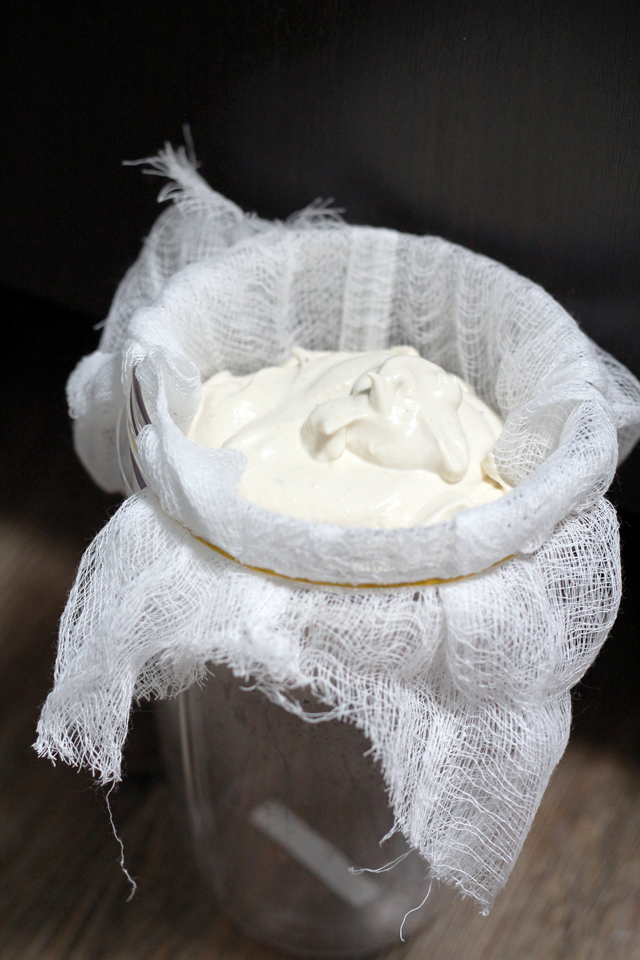
Plain cashew cream before straining.

Blueberry Cashew Cream Cheese from dontmissdairy.com

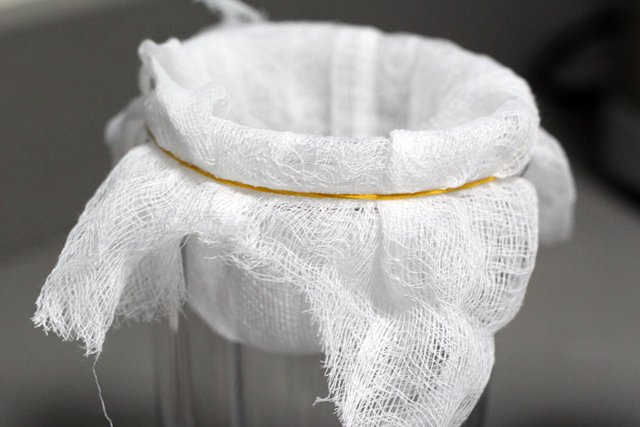
For a firmer cream cheese, strain using a cheesecloth positioned with a rubber band over a tall cup like this.

Make sure to cover the exposed cashew cream with plastic wrap to avoid it drying out. You can leave on the countertop or in the refrigerator overnight or up to 24 hours. Extra liquid will drip to the bottom of the bowl, leaving you with a firm, shapeable cream cheese base. There’s so much you can do with this, like adding different flavors or even shaping into a cheese ball.

Blueberry Cashew Cream Cheese from dontmissdairy.com

Set the cashew cream into the cheesecloth and cover with plastic wrap. Allow liquid to drip overnight or up to 24 hours. I put mine in the fridge.

Blueberry Cashew Cream Cheese from dontmissdairy.com

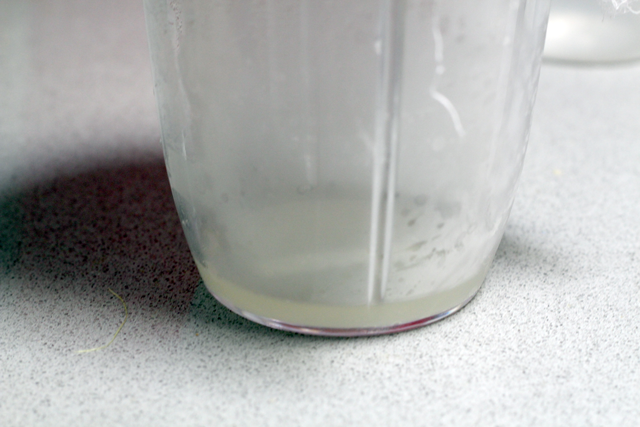
This one I let drip for about 16 hours. The liquid will collect at the bottom.

Blueberry Cashew Cream Cheese from dontmissdairy.com

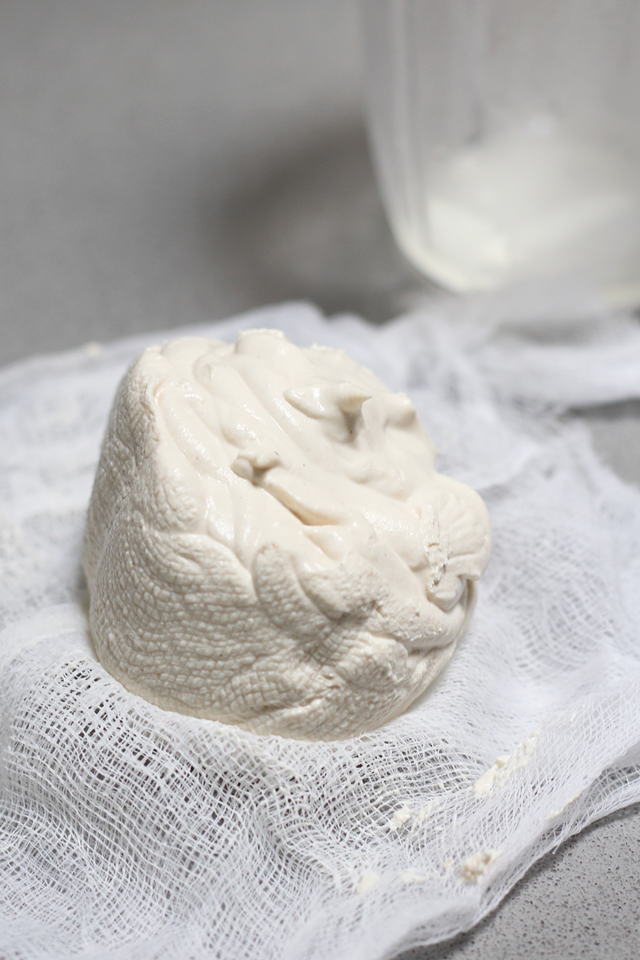
Finished cashew cream cheese, ready to be eaten, mixed with seasonings, or shaped into a cheese ball.

A faster option for a firmer cream cheese is to add 1 tablespoon of melted coconut oil or a thickener such as tapioca flour or xanathan gum (found in your local Whole Foods store) to your cashew cream, along with your flavor additives, then refrigerate. This will affect the taste, however.

The easiest option is to skip the thickening, which will result in a soft and fluffy cream cheese. It will have more of a whipped cream consistency–still thick enough  to spread on a bagel yet thin enough to spread on a crumbly biscuit or muffin. The softer version of the cream cheese is pictured. Make it your own and enjoy! 

If you do, share it on Instagram with #dontmissdairy. I’d love to see your version! Sharing dairy free recipes is so inspiring to others with lactose intolerance!

Blueberry Cashew "Cream Cheese"
Write a review
Print
Ingredients
  1. 1 cup raw cashews, soaked in water overnight
  2. fresh lemon juice from 1 lemon
  3. 2 teaspoons apple cider vinegar*
  4. 1/4 teaspoon sea salt
  5. 1/4 cup water
  6. 1 cup frozen blueberries
  7. 2 tablespoons white sugar
Instructions
  1. To soak cashews, place in a medium bowl and add water until just covered. Allow to sit overnight, or at least 8 hours. Strain the liquid and rinse the cashews well.
  2. In a high powered blender, add soaked cashews, lemon juice, apple cider vinegar, sea salt, and water. Blend until you achieve a smooth consistency, scraping the sides to incorporate. If necessary you can add more water 1 tablespoon at a time, but this will thin your final product. For a firmer cream cheese, strain in a cheesecloth overnight. For a faster, softer cream cheese, move on to the next step.
  3. In a small saucepan, simmer frozen blueberries and white sugar over low heat for about 10 minutes. Liquid should be so much reduced it is almost all evaporated. Remove from heat.
  4. In a medium bowl, mix cashew cream cheese and blueberry reduction until combined. Add a quick thickener if desired, such as melted coconut oil.** You can also add more sugar to taste. Refrigerate for at least four hours to cool and firm. Store in the refrigerator for up to a week.
Notes
  1. *Optional (Gives it that tangy cream cheese flavor. If you don't like the slight taste of apple cider vinegar, you can omit)
  2. **Blend with 1 tablespoon coconut oil for a quick firmer cream cheese option.
don't miss dairy https://dontmissdairy.com/
Blueberry Cashew Cream Cheese from dontmissdairy.com

Mini Vegan Key Lime Cheesecakes

Mini Vegan Key Lime Cheesecakes from dontmissdairy.com

I’m on a key lime flavor kick this summer. 

I’m sure you know these are not actually cheesecakes, but they really taste like them! There’s just something about cashews that imitate that cheesecake taste and texture. 

These delicious desserts are dairy-free, gluten-free, vegan, and mostly raw. They are made with cashews and coconut oil with a maple walnut crust. Fresh lime juice and lime zest give them their tropical key lime flavor.

While we are on the topic of lime zest, let’s talk about something.  

Does anyone know of a high tech/futuristic/affordable tool that automatically zests citrus for you? ‘Cause I could really use one of those. Maybe there’s something on Kickstarter? Please help! You know I like to keep my recipes as simple as possible.

Zesting is about as fun as folding laundry. And unless you are one of those people who like folding laundry, you get what I’m saying.

I tried to think of ways I could make this taste like key lime pie without having to zest a single lime…but, yeah, I got nothing. Taking the time to zest a few limes is so worth it. That tart, limey zest just pops in your mouth.

Mini Vegan Key Lime Cheesecakes from dontmissdairy.com

I served these key lime cheesecakes at a shopping party and they were a big hit among dairy eating folks! My little food processor was able to handle this noble task. They aren’t super smooth, a texture you would get by soaking the cashews for hours or by owning a Vitamix–the 1st option requires advance planning, the 2nd requires, well….a Vitamix. 

Ahhh Vitamix…I picture it standing tall on my granite countertop like the Lombardi Trophy of kitchen appliances (is it football season yet??). People will ooo and ahh and say things like, “Wow, you could sell these mini cheesecakes in a shop! They’re so perfect and smooth!”

But really, they don’t have to say anything. An empty plate where mini cheesecakes used to be is all I need to encourage me to keep making delicious dairy-free desserts–Vitamix or no Vitamix. They can always be smoother, but they still taste incredible.

These cheesecakes prove that you do not need a Vitamix to make this dessert. You do, however, need a food processor. If you don’t have a mini cheesecake pan, use a muffin pan lined with cupcake wrappers for easy removal. 

They are soft, so keep them in the fridge until you are ready to eat. I hope you enjoy these yummy desserts as much as I did!

Mini Vegan Key Lime Cheesecakes from dontmissdairy.com

Mini Vegan Key Lime Cheesecakes
Serves 12
Write a review
Print
For the Crust
  1. 2 cups raw walnuts
  2. 3 tablespoons maple syrup
  3. 1 teaspoon vanilla
For the Filling
  1. 2 cups raw cashews
  2. 1/2 cup coconut oil
  3. 2 tablespoons maple syrup (or more to taste)
  4. 1/2 cup key lime juice
  5. zest of 4-6 key limes
Instructions
  1. In a food processor, pulse raw walnuts until finely ground. Add maple syrup and vanilla and pulse until ball begins to form.
  2. Press 2 teaspoons of the walnut crust mixture into each bottom of the 12 cup mini cheesecake pan, or into a muffin tin lined with cupcake wrappers.
  3. Clean out your food processor to prepare the filling. Add cashews and pulse until finely ground.
  4. Add coconut oil, maple syrup, lime juice, and lime zest, and pulse until well combined. Spoon mixture evenly on top of walnut mixture. Sprinkle with extra lime zest for a pop of color and flavor.
  5. Freeze for one hour and then store in refrigerator. Keep refrigerated until ready to serve.
Adapted from Coconut Lime Cream Cakes
don't miss dairy https://dontmissdairy.com/
Mini Vegan Key Lime Cheesecakes from dontmissdairy.com

Almond Meal Pancakes with Berry Reduction and Coconut Cream

Almond Meal Pancakes with Berry Reduction and Coconut Cream from dontmissdairy.com
I’ve made these pancakes a bunch of times, but I hadn’t found the right opportunity to blog about them until now.

Not only have I been trying (extra emphasis on that word trying) to go gluten free, but my best friend is trying out the Paleo diet with her husband. She is a supportive wife, that’s for sure. I know how much she likes her Nutella and milkshakes and pasta.

She brought up a simple question when we were on the phone the other day: “What am I going to eat for breakfast?”

That really got my brain going. I’m always thinking of creative food options to meet different needs. I instantly thought of eggs baked in an avocado, eggs fried in a pepper ring, and my usual breakfast, a spinach and egg scramble. 

Then she said she wasn’t into eggs that much. Hmmmm.

A lightbulb clicked on above my head and I thought of my simple almond meal pancakes! Now, neither of us knew much about the Paleo diet, but we tried to guess based on quick research. If it’s okay to eat almonds, then it should be okay to have almond meal.

Almond Meal Pancakes with Berry Reduction and Coconut Cream from dontmissdairy.com

My pancake recipe calls for a tablespoon of maple syrup. We weren’t sure about that one… but they really don’t need the sweetener! It’s just a sweet, sweet bonus. So I replaced the tablespoon of maple syrup with a tablespoon of water.

And, oh my. That berry reduction and coconut cream.

To.

Die.

For.

Almond Meal Pancakes with Berry Reduction and Coconut Cream from dontmissdairy.com

This is definitely a Paleo dessert! It’s made with healthy whole foods with no added sugar and the protein content is high, but the almond meal and coconut cream have a lot of fat. It makes sense to limit your intake of nut products and full fat coconut milk. The berry reduction is also high in natural sugar. It’s pretty tasty though, so is that okay? Yes. Unless you are very strict about your diet, I say ok. 

Don’t let the small pancakes fool you; this is a very filling meal. Remember, it’s almond meal, not flour. This serves two people. 

I recommend making the berry reduction ahead of time and storing in the refrigerator for up to a few days. Reheat before serving or enjoy cold like jam. I used the coconut whipped cream tutorial from Oh She Glows. The almond meal pancakes are adapted from  Laura Dolson’s recipe on about.com.

This post is dedicated to the wives who try to follow diets their husbands are following to support them (and vice versa)! Go you!

Almond Meal Pancakes with Berry Reduction and Coconut Cream from dontmissdairy.com

Almond Meal Pancakes with Berry Reduction and Coconut Cream
Serves 2
A high protein, dairy free, gluten free, and Paleo breakfast option.
Write a review
Print
Ingredients
  1. 1 cup almond meal
  2. 2 eggs
  3. 1/4 cup sparkling water, plus 1 tablespoon*
  4. 2 tablespoons melted coconut oil, plus more for cooking
  5. 1/4 teaspoon sea salt
  6. 2 cups frozen berries (I used organic raspberries, blackberries, and blueberries)
  7. 1/2 cup coconut whipped cream**
For Berry Reduction
  1. Add berries to small saucepan over low heat. When berries begin to defrost, stir to speed up the process.
  2. Cook for 10-15 minutes or until berries are broken down and liquid is reduced, stirring occasionally.
For Pancakes
  1. Whisk almond meal, eggs, 1/4 cup water plus 1 tablespoon of water, and sea salt until well combined. Add melted coconut oil and thoroughly mix.
  2. Preheat a non stick pan or griddle over medium low heat and add a little coconut oil for frying.
  3. Using a 1/4 cup, pour the batter onto the griddle for little pancakes. Use your cup to spread the batter if it's very thick. You want thin pancakes.
  4. Cook for about two minutes then flip. They will start to have very small bubbles when ready to be flipped, not big ones like typical flour pancakes. Once the other side is done, remove from griddle to a plate to keep warm.
  5. Stack them, add berry reduction, and top with coconut whipped cream. This has no added sugar? Your tastebuds won't believe it.
Notes
  1. *You can use regular tap water. I used sparkling to add bubbles and make the pancakes fluffier.
  2. If you are not averse to extra sugar, replace the tablespoon of sparkling water with 1 tablespoon of maple syrup. It's not necessary for taste, but it does make them sweeter.
  3. **I followed the Coconut Whipped Cream Tutorial from Oh She Glows. I didn't add any sweetener or vanilla to the cream. You could also just scoop the chilled coconut cream out of the can and dollop it on your pancakes to soften on the hot berry reduction. It will taste the same but won't have the thick, whipped texture.
don't miss dairy https://dontmissdairy.com/

Almond Meal Pancakes with Berry Reduction and Coconut Cream from dontmissdairy.com
Did you try it? How did you like it? Leave me a comment!