Follow Me on Instagram

Instagram

Follow Me on Pinterest

don't miss dairy

Emily Stokes
I'm a lady who loves cheese, sour cream, & ice cream, but I recently became lactose intolerant. My key focus in recreating dairy recipes is taste, but I try to be as health conscious as possible. Some of my recipes are low lactose rather than dairy free. I'm also a writer, teacher, nanny, dog mom, housewife, native Yinzer, current Californian, and social organizer extraordinaire.

More

Missing Fall-Not Fat Pumpkin Bread

Here is a deliciously healthy pumpkin bread recipe that is more like a true bread rather than the super sweet cake-like version that is served in coffee shops. The 1/2 cup of whole wheat flour gives it some substance, while the 1/2 cup of Splenda (you can use any other sugar substitute) replaces half of the sugar, and the extra pumpkin eliminates the need for a cup of oil. By the way, you may gasp when you see that I’ve used olive oil in this recipe, but it really tastes great! If you are a skeptic, use vegetable oil or coconut oil instead.

Though I don’t recommend using all whole wheat flour because of the taste, go all out and use all whole wheat flour, no sugar, more pumpkin, and all egg whites if you want! However, my combination is a good one. It remains moist and flavorful–try for yourself! There’s that awesome secret ingredient of apple cider in there. Why add water when you can add apple cider? After many attempts at creating the perfect healthy pumpkin bread, I have come up with a recipe I will use year after year. The best part about this recipe? No butter or milk!

Ingredients:

1 cup all purpose flour
1/2 cup whole wheat flour
1/2 cup white sugar
1/2 cup Splenda or other healthier sugar substitute
1 tsp baking soda
1 can of pumpkin puree (15 oz)
1/8 cup olive oil
1 egg, 2 egg whites, beaten
1/4 cup apple cider
1/2 teaspoon nutmeg
1/2 teaspoon cinnamon
1/4 teaspoon sea salt
1/2 teaspoon ground cloves
1/4 teaspoon ground ginger
1/2 cup golden raisins
1/4 cup chopped pecans

Directions:

1. Preheat oven to 350 degrees Fahrenheit. In a medium bowl mix together flour, salt, sugar, Splenda, baking soda, and spices until well blended.

spice and sugar mixture in bowl.

2. In a large bowl, combine pumpkin, oil, eggs, and apple cider. Add dry ingredients into this mixture, and stir until combined and completely moistened but do not over mix. It needs to stay spongy.

pumpkin, egg, and apple cider mixture.Wet ingredients mixed.

3. Carefully fold in raisins and nuts.

4. Pour into greased loaf pan–even if it is non-stick you need to oil it. Bake 50-60 minutes or until toothpick comes out clean. Once finished, let cool for up to an hour before removing from pan. Enjoy at your holiday event!

This bread is best stored in the refrigerator.

Finished pumpkin bread

Thanksgiving Turkey Tips

How do you make the tastiest, tenderest turkey with the least amount of work involved? Forget brining and basting, just cook it in a Reynolds Oven Bag. This is the not-so-secret method of my grandma’s turkey cooking, passed down to me on my first Thanksgiving as a married woman. I love simple turkeys best–they don’t taste like salt and flavorings, they taste like real, tender, moist, delicious turkey. Make a simple thick gravy from the drippings and pour it over everything. There is nothing quite like it. Here are a mix of tips my grandmother gave me, and also some from Reynolds, when making a turkey in an oven bag.

Tools you will need:

Reynold’s Oven Bag, Turkey Size
Large baking pan–we get the disposable pans.
A turkey thermometer if your turkey doesn’t come with one
If you are stuffing it, get some some string to tie the legs together, and a wire skewer for the neck

Ingredients:

Frozen turkey, any size
Olive oil or canola oil
Sea salt and black pepper
1 yellow onion
3 celery stalks
1 tablespoon of flour
Your favorite stuffing
*Optional: Paprika

Directions:

1. Thaw your turkey according to directions on packaging. Ours was 23 lbs. and needed three days to thaw in the refrigerator. It was still frozen in the inside when we opened it, so we rinsed this part under warm water. We were cooking for a huge group, not just the two of us!

2. Preheat oven to 350 degrees Fahrenheit and then clean out the turkey. Take out the parts inside the neck and chest cavity–reach in and pull out everything that shouldn’t be there. Rinse it well, like giving it a bath. Take off the oil gland if it’s still on the tail–ours was. Place your cleaned turkey on a cutting board or clean surface and pat the skin dry with paper towels.

3. You can take this time to prepare your favorite stuffing if you haven’t already. Follow the poultry preparations on the stuffing bag or box. My favorite is a whole grain cranberry stuffing in a bag I get at Whole Foods. We made two batches, including fresh diced onions and celery as it called for in the poultry directions.

4. Now you can prepare the oven bag. Open it up and add a tablespoon of flour. Close the opening and shake it around. This will coat the bag and prevent it from sticking to the turkey and bursting. Slice a yellow onion and your celery stalks and add them to the bag–your turkey will sit on top of them.

5. Rub the turkey in your choice of oil. We once used a mixture of butter and olive oil, but we don’t use butter around here anymore. It turned out great, though. This year we used canola oil and it still turned out fantastic. After the turkey is covered, lightly sprinkle sea salt and black pepper over every inch of it. If you want a browner turkey, sprinkle paprika over it.

6. Put the stuffing in the chest cavity and neck, then close the neck so the stuffing doesn’t fall out when you move the bird.

7. Place the turkey in the Reynold’s bag on top of the vegetables. The tricky part is which side do you place it on? Traditionally, you would put it on it’s back, for a pretty, brown turkey. But for flavor, my grandma recommends putting it breast side down. She says this makes the moistest turkey. So that’s what we did. Make sure you tie it securely with the provided nylon tie.

8. Cut six half inch slits on top of the bag, and insert your turkey thermometer through one of these slits, into the thickest part of the inner thigh, not touching the bone. Tuck in the ends of your bag so they don’t burn in the oven.

9. Now comes one of the best parts about the oven bag–the baking time. Using this method reduces the baking time, so it’s really convenient, especially if you have a very large turkey like we did. Bake 2 to 2 1/2 hours for a 12 to 16 lb. turkey, 2 1/2 to 3 hours for a 16 to 20 lb. turkey, and 3 to 3 1/2 hours for a 20 to 24 lb. turkey. Add 1/2 hour for a stuffed turkey. When it’s done the red thermometer will pop up. We cooked ours for a little over four hours, but without the bag it could have taken six hours.

10. Take your turkey out and let it sit for 15 minutes before loosening the bag. If you are making gravy–this method produces an insane amount of tasty turkey drippings. It will be flavored by the onion and celery, salt and pepper. We cut a corner of the bag and drain it into a pot, straining any stray onion slices and stuffing. Read on to make your gravy. Happy Turkey Day!

Making the Gravy

Ingredients:

Turkey drippings
Cornstarch

Directions:
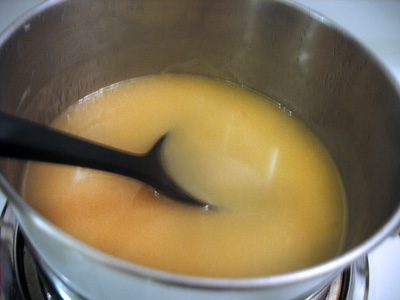
1. Dissolve 1 tablespoon of cornstarch in 1 tablespoon of water and set aside.

Whisking gravy in a pot.

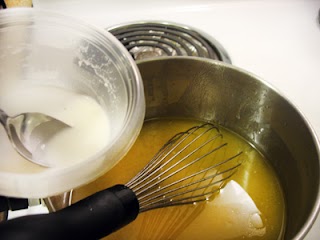
2. Stir into turkey broth with a wire whisk, and heat on medium high. Bring to a boil and stir constantly. If the gravy is not thick enough, or if you have tons of gravy like we did, add another tablespoon of cornstarch and water mixture until desired thickness. Pour over turkey and mashed potatoes. Mmmm.

Finished gravy.

Non-Dairy Creamer, or a replacement for Half & Half

I used to drink half and half in my coffee every morning. No sugar, just cream. It really made the perfect cup of coffee. And I am a huge coffee drinker. When even a little bit of half and half made me feel sick, I had a hard time handling it. At first I just dealt with the discomfort, but stomach cramps finally led me to try other products.

Plain soy milk in coffee was just disgusting. Even Very Vanilla Soymilk didn’t really cut it for me. I tried Coconut Milk Creamer–totally gross. I didn’t want to do it, but for a long time I started using Coffeemate non-dairy creamer. That stuff is really terrible for you–it’s like drinking trans fat. I tried many different flavors that were tasty. My favorites were the sugar-free vanilla, which tasted like marshmallow to me, the peppermint mocha, and original, which was the closest taste to half and half that I could find. But they completely covered the taste of the coffee as well. That’s okay if you are drinking ground Foldgers, but not okay if you bought a new bag of fresh, whole bean Caribou Blend. What can I say? I love my coffee.

I realized that when I ordered a soy mocha or soy latte at Starbucks it tasted amazing. So why didn’t my coffee taste amazing when I added vanilla soy milk? The answer was in the steaming. I don’t know why, but heated soy milk in coffee tastes ten times better than cold soy milk in coffee. Especially when that soy milk is very, very sweet. The sweeter the better.

So after all of my experiments and attempts to find the perfect healthy replacement for half and half, I have finally found the answer. I wanted to pass along my knowledge, which is actually a small recipe.

Ingredients:

8ounce cup of coffee
1/3 cup Silk Very Vanilla Soymilk
1  teaspoon or packet of sugar

Directions
1. Mix the soymilk and sugar (I use Splenda or Truvia) in a microwave safe mug and heat for 30 seconds.

2. Pour in the fresh, hot gourmet coffee and find your happy place.

New Tip:

You can also substitute vanilla soy milk with soy vanilla ice cream–it’s a great cream alternative to your coffee and helps it cool down as well.

Coffee with soy milk.