All posts by Emily Stokes

About Emily Stokes

I'm a lady who loves cheese, sour cream, & ice cream, but I recently became lactose intolerant. My key focus in recreating dairy recipes is taste, but I try to be as health conscious as possible. Some of my recipes are low lactose rather than dairy free. I'm also a writer, teacher, nanny, dog mom, housewife, native Yinzer, current Californian, and social organizer extraordinaire.

Chocolate Cashew Butter

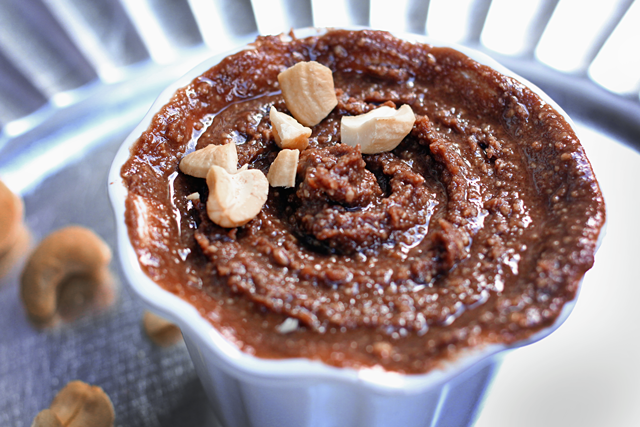
Chocolate Cashew Butter from dontmissdairy.com
We had a ton of roasted cashews that we weren’t eating, so I decided to turn them into something we would eat.

Most cashew cream or cheese recipes I’ve been wanting to try call for raw cashews, so I couldn’t make any of these. Trail mix left me with kind of the same problem, and granola bars seemed kind of a blah idea. I know, I know– everybody loves granola bars except me. It’s not that I don’t like them, I just don’t love them.

I started thinking about how I’ve been meaning to make a dairy free version of Nutella, and then it occurred to me: I bet roasted cashews would make a really delicious chocolate cashew butter.  Go!

First I pulverized the roasted cashews in my food processor, then added vegetable oil, white sugar, and cocoa powder. You can definitely add a sweeter oil to yours, like a nut oil. I just like to use what I have in my kitchen already. I did have a little trouble getting this to be low sugar and still taste like chocolate, but with some experimenting and taste testing, I eventually got a good flavor balance. 

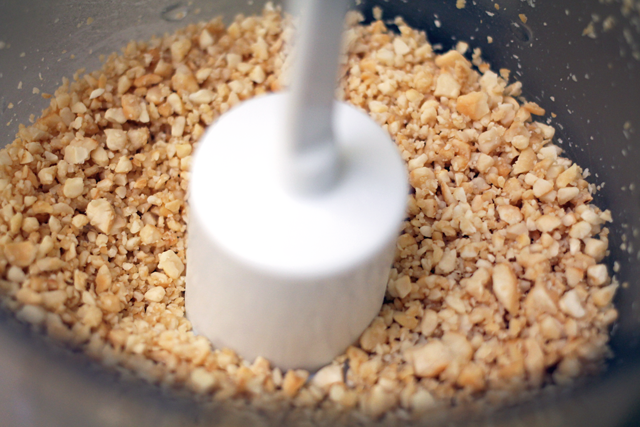
Cashews in food processor
Crumbled cashews

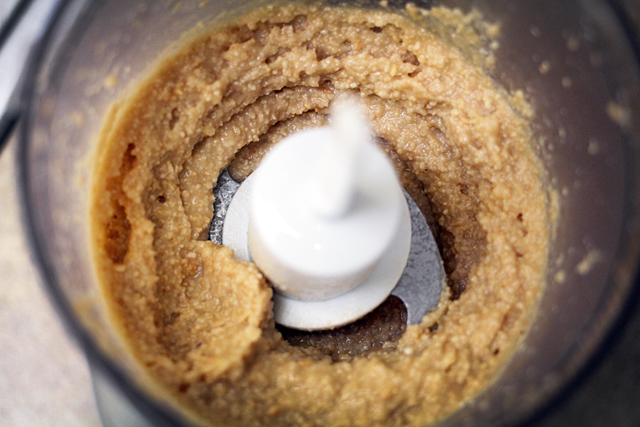
Processed cashews
It’s sweet but not too sweet, with a buttery, chocolate flavor. YUM.

I suppose I could have kept processing it to make it smoother, but I’m impatient. My food processor is not the greatest and it was taking a long time. Feel free to make yours into a smooth-and-shiny-as-Nutella-butter….or mix in some bigger cashew pieces to make a crunchy butter! 

This is great for spreading and dipping. Spread on graham crackers or croissants, or make a cashew butter and jelly sandwich. I ate most of this batch as a dip with salted pretzels, which was so addicting. It was one of those snacks where you eat a few and you’re like, okay, just one more, then that one more turns into an empty bag of pretzels and a need to buy more cashews.

I hope you enjoy this simple chocolate cashew butter as much as I did! 

Chocolate Cashew Butter from dontmissdairy.com

Chocolate Cashew Butter
Write a review
Print
Ingredients
  1. 1 cup roasted cashews (salted is okay)
  2. 3 tablespoons oil of your choice
  3. 2 tablespoons, plus 1 teaspoon cocoa powder
  4. 1/8 teaspoon vanilla
  5. 1/8 cup sugar
  6. dash of sea salt
Instructions
  1. In a food processor, grind your cashews until finely chopped.
  2. Add oil and process until smooth.
  3. Add vanilla, cocoa powder, sugar, and salt, then process until well combined. Taste, and add more sugar or cocoa powder to your liking.
don't miss dairy https://dontmissdairy.com/

Healthy Chili with a Kick

Low Sodium Chili from dontmissdairy.com(Updated from original post “Low Sodium Chili” on November 10th, 2011)

You don’t need to add more salt to a dish to add flavor, just add more flavor! To make chili less complicated, canned tomatoes, sauce, and beans are a great option. But this usually packs your chili with a ton of sodium.

It’s unnecessary.

Opt for “no salt added” canned goods instead and you will create a much healthier meal. These are conveniently labeled in the canned goods section of your local grocery store. You can always add more salt to taste in your finished recipe. It’s easier to add salt than remove it!

Here is my go-to chili recipe that replaces all added sodium with a couple teaspoons of sea salt and uses sugar and spice to bring out a flavorful meal for chilly nights.

I grew some delicious (but super hot) Bulgarian Carrot Peppers in my garden this year, and they are a key ingredient. Make sure you wear gloves when dicing them! If the oils get in your skin it will burn like crazy.

Healthy chili from dontmissdairy.com!

You can make this deliciously spicy, low fat, low sodium chili quickly on the stove top–it will take about 30 minutes to cook. Or, you could simmer it for four to six hours in the Crockpot, whatever method suits your time and energy level.

I usually cook it on low in the Crockpot when I want to come home from work to a ready dinner. If you choose this method, make sure you sauté your veggies over the stovetop before adding them to the slow cooker for the best flavor.

Use 93% or higher lean ground beef to make this recipe even healthier. I try to find 96% lean. It’s more expensive but worth it when it comes to eliminating excess fat from your diet. 

Healthy Chili with a Kick
Serves 6
Write a review
Print
Prep Time
10 min
Cook Time
40 min
Prep Time
10 min
Cook Time
40 min
Ingredients
  1. 1 pound 93% or higher lean ground beef
  2. 1/2 teaspoon ground pepper
  3. 1 tablespoon olive oil
  4. 1 large yellow onion, diced
  5. 1 green bell pepper, diced
  6. 1 red bell pepper, diced
  7. 1-2 Bulgarian carrot peppers or serrano chili peppers, diced
  8. 2 cloves garlic, minced
  9. 2 cans no salt added diced tomatoes
  10. 1 can unsalted tomato paste
  11. 2 cans no salt added kidney beans, rinsed and drained
  12. 1/4 cup red wine such as Cabernet Sauvignon
  13. 1/4-1/2 cup water or low sodium beef broth
  14. 1 bay leaf
  15. 2 tablespoons chili powder
  16. 2 teaspoons sea salt
  17. 1/2 teaspoon paprika
  18. 1/2 teaspoon ground red pepper
  19. 1 tablespoon white sugar
Instructions
  1. In a large stock pot over medium heat, sprinkle the black pepper onto the ground beef and cook meat until browned and no pink remains. Carefully drain excess fat then return pot to stovetop.
  2. Add olive oil, onion, peppers, and salt to the pot. Stir and cook for five minutes, or until onions and peppers begin to turn translucent.
  3. Make a well in the middle of the pot ingredients and add the minced garlic. Cook garlic for no more than 30 seconds before stirring with the rest of the mixture.
  4. Add the diced tomatoes with liquid, drained and rinsed kidney beans, tomato paste, wine, water or broth, sugar, spices, and bay leaf into the pot. Set on medium high heat to start the boiling process.
  5. Once the mixture starts to bubble, reduce to medium low heat and cover. Simmer for thirty minutes, stirring occasionally. If you make it in the Crockpot, cook on low for at least six hours or high for four hours. Salt to taste.
Notes
  1. Serve with shredded vegan cheese, chopped onions, and lactose free sour cream!
don't miss dairy https://dontmissdairy.com/

Low sodium chili recipe from dontmissdairy.com
Low sodium chili from dontmissdairy.com

Swiss Chard and Garbanzo Bean Soup

Swiss Chard and Garbanzo Bean Soup

Nothing in my garden has done better than my beautiful and hardy Rainbow Swiss Chard.

I never would have grown Swiss Chard, but three things made it happen this year. The first was that, since I was planting in July, I needed to plant vegetables that were able to withstand brutal heat but also fare well in the coming cooler weather.

Second, my brother grew Red Swiss Chard this summer. He picked some from his garden while I was visiting in June and asked if I could cook it for him. I made it too spicy for his taste, but I loved it.

The third reason I grew this vegetable is because my husband went with me to the nursery and picked it out (how could I say no?).

At first, I thought it wouldn’t survive the heat when I planted the tiny seedlings. Even though they had partial shade during the day, they still looked a little droopy. Never did I think they would grow into tall, full, beautiful multicolored leaves, but they did!

Rainbow Swiss Chard for Swiss Chard and Garbanzo Bean Soup
It is an absolutely gorgeous plant. What’s better is that the chard plants have been in their little earth box for three months, continually sprouting new leaves.

I just keep cutting leaves off the side of the shoots near the base of the plant. I did this to make it last as long as possible, and it still hasn’t quit. It hasn’t had a single pest problem or caught a disease. It’s the healthiest, tastiest, prettiest plant that I ever did grow.

If you’re interested in starting a small patio garden, I recommend this as a perfect pot plant to begin with.

Rainbow Swiss Chard from my garden.

The hard thing isn’t coming up with recipes to use it in but having enough of it for the recipes I come up with! I planted six seedlings, and I’ve only been able to make a few recipes. I’ve been wanting to try it in a nice fall soup, and I finally got my chance.

With the recent cooler weather, my chard flourished even more, giving me a huge crop that complements this simple vegan vegetable soup very nicely. This recipe is quick to make on the stove, but you can cook it in the crock pot easily, too.

Just make sure you add the chard during the final minutes of cooking. While it can withstand longer cooking times, it tastes best lightly cooked.

And don’t you dare throw those beautiful stems away! Cook them in my Swiss Chard with Bacon recipe or fry them in some olive oil, salt, & black and red pepper.

Ingredients:
(Scroll to the bottom for easy to read and print recipe card)

1 tablespoon extra virgin olive oil
1 yellow onion
1 teaspoon sea salt
1 teaspoon black pepper
2 carrots, diced
2 celery ribs, diced
1 teaspoon sage
1 teaspoon thyme
3 cloves garlic, minced
4 cups unsalted vegetable stock
1 can garbanzo beans, rinsed and drained
1/4 cup sweet white wine, such as Riesling
1 bunch Rainbow Swiss Chard (10-12 leaves),  coarsely chopped or torn and stems removed

Directions:

1. In a large stock pot over medium heat, add olive oil, onions, salt, and pepper. Cook onions for three minutes, then add carrots, stirring occasionally. Add a splash of cooking stock and a splash of white wine. Cook for about five minutes.

Sautéing onion.

Sautéing onions and carrots

2. When onions are translucent looking and carrots become soft, add celery, sage, thyme. Cook for two minutes.

Add celery.

3. Add garlic, stir, and cook for no more than 30 seconds. Add vegetable stock, the rest of the white wine, and garbanzo beans and stir.

Add garlic.

Add vegetable stock.

Garbanzo beans in a colander.

4. Bring soup to a boil, then reduce heat, cover, and cook for 15 minutes.

5. After 15 minutes, add the chard and stir. Cover and cook for five more minutes. Remove pot from heat and uncover. Serve and enjoy. I’d love to hear your comments!

Chopped Rainbow Swiss Chard with Stems removed.

Adding the chard to the soup.

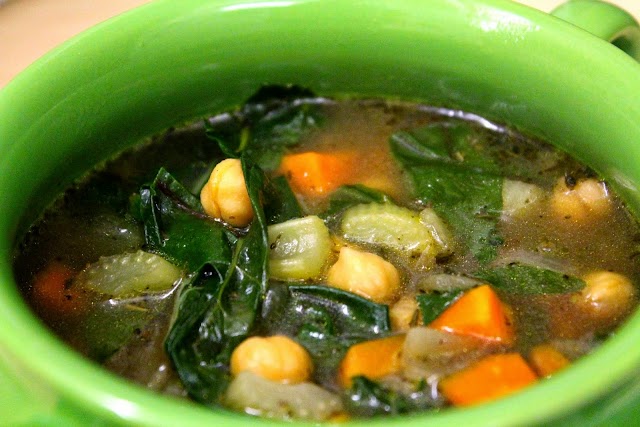
Swiss chard and garbanzo bean soup

Close up of swiss chard soup.

Even closer close up of swiss chard soup.

Swiss Chard and Garbanzo Bean Soup
Serves 6
Write a review
Print
Prep Time
10 min
Cook Time
25 min
Total Time
35 min
Prep Time
10 min
Cook Time
25 min
Total Time
35 min
Ingredients
  1. 1 tablespoon extra virgin olive oil
  2. 1 yellow onion
  3. 1 teaspoon sea salt
  4. 1 teaspoon black pepper
  5. 2 carrots, diced
  6. 2 celery ribs, diced
  7. 1 teaspoon sage
  8. 1 teaspoon thyme
  9. 3 cloves garlic, minced
  10. 4 cups unsalted vegetable stock
  11. 1 can garbanzo beans, rinsed and drained
  12. 1/4 cup sweet white wine, such as Riesling
  13. 1 bunch Rainbow Swiss Chard (10-12 leaves), coarsely chopped or torn and stems removed
Instructions
  1. In a large stock pot over medium heat, add olive oil, onions, salt, and pepper. Cook onions for three minutes, then add carrots, stirring occasionally. Add a splash of cooking stock and a splash of white wine. Cook for about five minutes.
  2. When onions are translucent looking and carrots become soft, add celery, sage, thyme. Cook for two minutes.
  3. Add garlic, stir, and cook for no more than 30 seconds. Add vegetable stock, the rest of the white wine, and garbanzo beans and stir.
  4. Bring soup to a boil, then reduce heat, cover, and cook for 15 minutes.
  5. After 15 minutes, add the chard and stir. Cover and cook for five more minutes. Remove pot from heat and uncover. Serve and enjoy.
Notes
  1. You can cook this in the crock pot, too. Just make sure you add the chard during the final minutes of cooking. While it can withstand longer cooking times, chard tastes best lightly cooked.
don't miss dairy https://dontmissdairy.com/

Want to be notified as soon as I post a new recipe? Please subscribe to my blog to receive emails for each new post, or follow me on Pinterest or Google+. Thanks for reading!