Holiday

Follow Me on Instagram

Instagram

Follow Me on Pinterest

don't miss dairy

Emily Stokes
I'm a lady who loves cheese, sour cream, & ice cream, but I recently became lactose intolerant. My key focus in recreating dairy recipes is taste, but I try to be as health conscious as possible. Some of my recipes are low lactose rather than dairy free. I'm also a writer, teacher, nanny, dog mom, housewife, native Yinzer, current Californian, and social organizer extraordinaire.

Holiday

Sweet Potato Casserole with Walnut Crumble

Sweet Potato Casserole with Walnut Crumble from dontmissdairy.com
This is the favorite dish for our Thanksgiving meal! It’s sweet, creamy, and delicious, yet completely dairy- and gluten-free.

Instead of milk and butter, this recipe calls for sweet vanilla soy milk and your favorite dairy free butter alternative such as Smart Balance Light or Earth Balance spread.

While we had a very small Thanksgiving get-together this year, I still made a full casserole of this recipe. We were determined to have lots of leftovers!

I adapted this recipe from Yummy Sweet Potato Casserole on allrecipes.com. I hope it becomes a holiday favorite for your family!

Sweet Potato Casserole from dontmissdairy.com

Sweet Potato Casserole with Walnut Crumble
Serves 12
Write a review
Print
Casserole
  1. 4 sweet potatoes, peeled and cubed
  2. 1/2 cup white sugar
  3. 2 eggs, beaten
  4. 1/2 teaspoon salt
  5. 4 tablespoons Smart Balance Light, softened
  6. 1/2 cup Silk Very Vanilla Soymilk
  7. 1/2 teaspoon vanilla extract
Topping
  1. 1/4 cup brown sugar
  2. 3 tablespoons Smart Balance, melted
  3. 1/2 cup chopped walnuts
Instructions
  1. Preheat oven to 325 degrees Fahrenheit.
  2. Put cubed sweet potatoes in a medium saucepan and cover with water. Bring water to boiling, then reduce heat. Simmer over medium low heat until tender. Use a fork to test softness after 10 minutes. Drain.
  3. In a large bowl, mix together the sweet potatoes, white sugar, eggs, salt, Smart Balance, soy milk, and vanilla with an electric mixer until smooth. Transfer to a 9x13 inch baking dish.
  4. Sprinkle the crumbled walnuts evenly over the sweet potato mixture. Add melted butter on top, and then sprinkle with brown sugar.
  5. Bake for 30 minutes.
Adapted from Yummy Sweet Potato Casserole
don't miss dairy http://dontmissdairy.com/

Sweet Potato Casserole with Walnut Crumble from dontmissdairy.com

Flavorful Dairy-Free, Fat-Free Mashed Potatoes

Dairy free, fat free mashed potatoes from dontmissdairy.com

(Updated from post previously published on November 18, 2012)

Healthy mashed potatoes here! This is my go-to mashed potatoes recipe that I make for Thanksgiving every year. You won’t believe how flavorful this dish is, considering that it’s vegan, gluten free, dairy free, fat free, and low sodium. Heavenly!

Dairy free, fat free mashed potatoes from dontmissdairy.com

Right after mashing, adding the chives.

Did you know that russet potatoes are practically fat free? Mashed potatoes are often so fattening because of the ton of butter and milk added to them. Okay, okay, I know all about carbs, but it’s Thanksgiving!

And if you must eat mashed potatoes, why not make them as healthy as possible, without sacrificing taste? 

I’ve tried this recipe using chicken and vegetable stock. I always end up adding some sea salt, but it doesn’t need much. If you’d like to keep this dish vegan, stick with vegetable stock. Here’s a great tip: save some of the stock you drain in the refrigerator, and add to the potatoes for reheating.

You can try adding some other herbs to this as well. I have a lovely pot full of fragrant chives, which is why they are featured in this dish. But you could also try fresh parsley or maybe thyme? Please let me know if you do and how it turns out! The chives keep well, even through re-heating.
Dairy free, fat free mashed potatoes

Flavorful Dairy-Free, Fat-Free Mashed Potatoes
Serves 6
Write a review
Print
Ingredients
  1. 6 russet potatoes, peeled and cubed
  2. Unsalted chicken or vegetable stock
  3. 1-2 tablespoons chopped fresh chives
  4. 1/2 teaspoon black pepper, or to taste
  5. 1/4 tsp sea salt (optional)
Instructions
  1. In a large pot, pour stock over peeled, cubed potatoes until just covered. Bring to a boil over high heat.
  2. Once boiling, reduce heat to medium low, cover and simmer 12-15 minutes or until potatoes are tender. Try testing with a fork for softness. The potato cube should break apart easily.
  3. Drain, but reserve the broth.
  4. With a hand masher or electric mixer, mash potatoes with 1/4 to 1/2 cup reserved broth, adding a little at a time. Be careful not to overdo it, or the potatoes could be too moist. Stop adding broth at desired consistency.
  5. Stir in chives, salt, and pepper.
don't miss dairy http://dontmissdairy.com/

Dairy free, fat free mashed potatoes from dontmissdairy.com

No-Bake Vegan Pumpkin Pie Bites

Vegan Pumpkin Pie Bites from dontmissdairy.com
Want to try something amazing? Trust me when I say, there is nothing healthy tasting about these incredible and incredibly healthy pumpkin pie bites.

My go-to pumpkin pie recipes have undergone many changes over the years, adapting to my dietary restrictions and taste preferences. But this year I thought I’d go all out and make a dairy-free, gluten-free, vegan pumpkin pie. I did some research to see if this was possible.

It was very possible.

No-bake Vegan Pumpkin Pie Bites from dontmissdairy.com

The trick was what recipe to trust, choose, and how to adapt it. I found a lot of raw pie crust recipes made with dates, and, unfortunately, I am not the biggest fan of dates, so they are not a usual ingredient I buy. Not wanting to make a special trip to the store just for dates, I found a recipe on lunchbox.com for no-bake pumpkin walnut pie—date free—and decided to adapt it to fit the ingredients in my kitchen.

During my research I saw so many complicated no-bake raw crusts. They called for all kinds of nuts and ingredients. I just kept thinking about how simple a raw crust should be. I mean, anything can be crumbled and made into a crust! (It just needs to taste awesome)

So I simplified the crust into three ingredients, an idea I found on hacres.com: walnuts, maple syrup, and vanilla. It’s a treat in itself! It’s technically not raw, but there is no baking involved. I was eating this before I could turn it into a crust. I thought this combination would be pretty sticky, but it’s actually not. It’s smooth and buttery. Nevertheless, I still greased the bottoms of my mini cheesecake pan for easier removal.

Making three ingredient walnut pie crust from dontmissdairy.com.

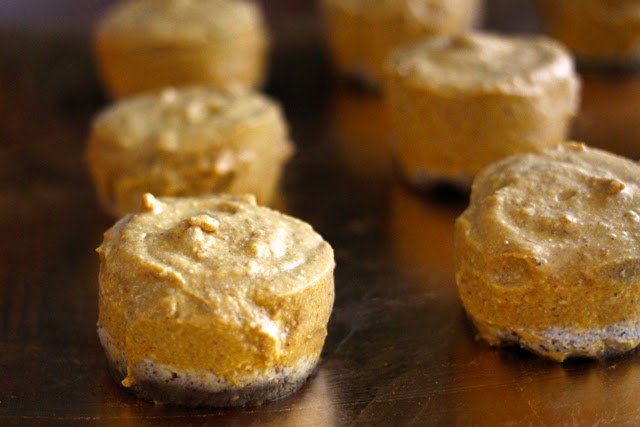
This is what the crust should look like after processing.

No-bake walnut pie crust from dontmissdairy.com.

Pressed walnut crust in mini cheesecake pan.

I made these bites to try something different, and to serve individually at a party. I think this would work very well as a whole pie, and the measurements should be the same.

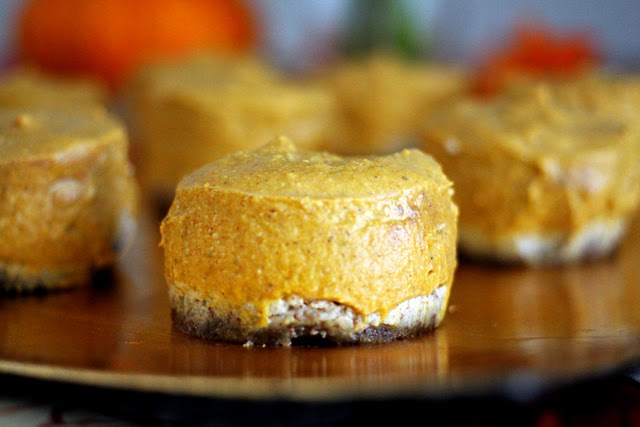
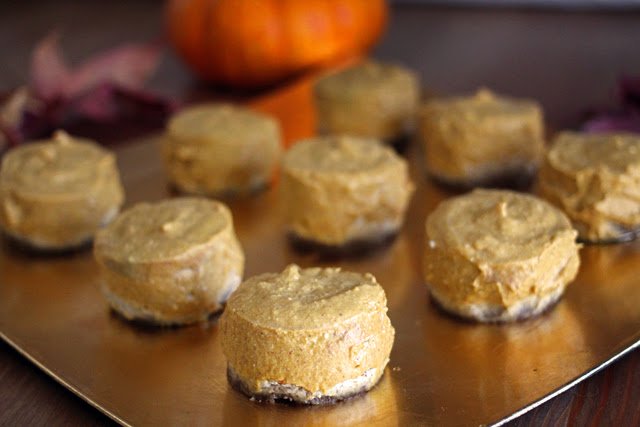
If you are making pumpkin pie bites versus a whole pie, keep in mind that these are very soft and delicate. Like whipped cream, these delicious, fluffy pie bites will start to soften as soon as they are taken out of the cold.

I did not wrap the bites in paper while making because I wanted to see how pretty they were. But I recommend making these in cupcake liners or individual serving cups unless you are very patient. I made mine in a mini cheesecake pan. I used a butter knife to loosen the pumpkin pie filling from the edges, then pushed them out from underneath very carefully.

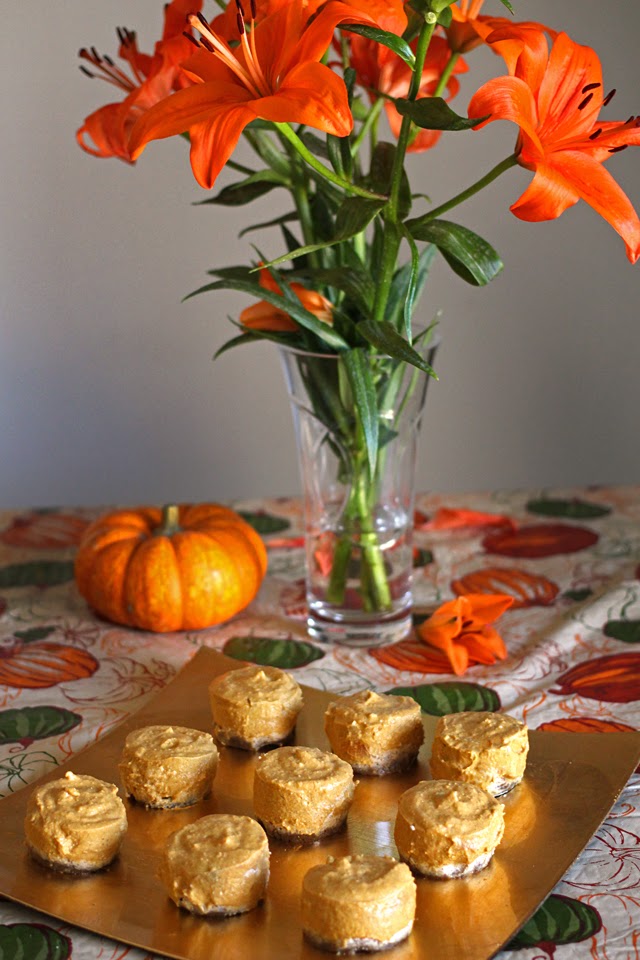
To serve them unwrapped, place pumpkin pie bites on a chilled tray or individual plates for immediate serving. Since I was transporting mine, I placed them in tulip parchment liners, which unfold and fold back easily. These could also be frozen for an hour so they become easier to serve, and should have the consistency of ice cream.  Keep them in the freezer longer in an airtight container for frozen pumpkin treats.

No-bake Vegan Pumpkin Pie Bites from dontmissdairy.com

This is my pumpkin pie bite wrapped in a tulip parchment paper liner. Easy to serve, easy to eat!

For a thick, solid filling, use coconut oil and full fat coconut cream, which stiffens and solidifies upon chilling. Also, make sure you use walnuts for this recipe. The walnuts act as a thickening agent to keep the filling solid. They are also heart healthy!

Maple syrup is apparently healthy for you as well—in moderation. This recipe calls for a small amount of maple syrup, but it goes a long way! These pumpkin pie bites are perfectly sweetened. I served them at a Halloween party, and they were a big hit.

I love creating as many recipes I can that adapt to different dietary restrictions because, hey, I know how it feels.

No-bake Vegan Pumpkin Pie Bites from dontmissdairy.com

No-Bake Vegan Pumpkin Pie Bites
Write a review
Print
For the Crust
  1. 2 cups raw walnuts
  2. 3 tablespoons maple syrup
  3. 1 tsp vanilla
For the Filling
  1. 1 can pumpkin (15oz)
  2. 4 tablespoons maple syrup
  3. 1/2 cup raw walnuts
  4. 1 cup full fat coconut cream (the solid part of the canned coconut milk that separates when chilled)
  5. 1/8 cup coconut oil, melted
  6. 1/2 teaspoon sea salt
  7. 1 teaspoon ground cinnamon
  8. 1/4 teaspoon ground ginger
  9. 1/4 teaspoon ground nutmeg
  10. 1/8 teaspoon ground cloves
For Crust
  1. Pulse walnuts in a food processor until finely crumbled. Add syrup and vanilla and pulse until ball forms.
For Filling
  1. Pulse 1/2 cup walnuts in food processor until finely crumbled. Add 4 tablespoons maple syrup, 1 teaspoon vanilla, salt, and all spices then pulse until smooth.
  2. Add pumpkin 1/3 cup at a time to food processor and pulse until well combined.
  3. Transfer pumpkin mixture to medium bowl. Stir in 1 cup full fat coconut cream (leave the clear liquid behind in the can).
  4. At this time, taste and add more sweetener if desired.
  5. For the last step, add melted coconut oil and stir quickly. Once cool it will begin to solidify.
To Complete Pie Bites
  1. Brush 12 cup mini cheesecake pan bottoms with coconut oil or Smart Balance Light. Alternatively, use a 9 inch greased pie pan or paper lined cupcake tin.
  2. Press 3/4 tablespoon (about 2 teaspoons) of walnut mixture into bottom of mini pans to form crusts.
  3. Spoon filling evenly into crusts. There may be a tiny bit left over to snack on. Refrigerate for at least four hours to firm, then pop out of the tins and serve immediately. Filling will soften if not kept refrigerated.
don't miss dairy http://dontmissdairy.com/

No-bake Vegan Pumpkin Pie Bites from dontmissdairy.com